Are you in Canada? Click here to proceed to the HK Canada website.

For all other locations, click here to continue to the HK US website.

Human Kinetics Logo

Purchase Courses or Access Digital Products

If you are looking to purchase online videos, online courses or to access previously purchased digital products please press continue.

Mare Nostrum Logo

Purchase Print Products or eBooks

Human Kinetics print books and eBooks are now distributed by Mare Nostrum, throughout the UK, Europe, Africa and Middle East, delivered to you from their warehouse. Please visit our new UK website to purchase Human Kinetics printed or eBooks.

Feedback Icon Feedback Get $15 Off

Methods for immobilizing the fractured foot and ankle

This is an excerpt from Athletic Taping, Bracing, and Casting, 4th Edition With HKPropel Access by David Perrin & Ian McLeod.

Immobilization of the fractured foot and ankle can be accomplished with splints or casts such as a posterior splint (figure 2.32), non-weight-bearing short leg cast (figure 2.33), and weight-bearing short leg cast (figure 2.34).


Figure 2.32 Posterior splinting procedure applied to immobilize the foot and ankle. Position the foot and ankle in the functional position, which is 0° of dorsiflexion. Measure 4 inches (10 cm) beyond the base of the popliteal fossa and 4 inches (10 cm) beyond the metatarsal heads to determine the amount of stockinette needed. Apply the stockinette. Beginning at the metatarsal heads, roll the cast padding circumferentially from distal to proximal ending at the base of the popliteal fossa. Measure from the base of the popliteal fossa to the metatarsal heads to determine the length of the splint. Starting at the metatarsal heads, position the posterior splint against the plantar surface of the foot and posterior aspect of the leg. Fold down any excess splint material at the knee. Fold the stockinette and cast padding over the ends of the fiberglass splint. Starting distally, secure the splint in place with an elastic wrap. () Completed posterior splint.

Figure 2.32 Posterior splinting procedure applied to immobilize the foot and ankle. Position the foot and ankle in the functional position, which is 0° of dorsiflexion. Measure 4 inches (10 cm) beyond the base of the popliteal fossa and 4 inches (10 cm) beyond the metatarsal heads to determine the amount of stockinette needed. Apply the stockinette. Beginning at the metatarsal heads, roll the cast padding circumferentially from distal to proximal ending at the base of the popliteal fossa. Measure from the base of the popliteal fossa to the metatarsal heads to determine the length of the splint. Starting at the metatarsal heads, position the posterior splint against the plantar surface of the foot and posterior aspect of the leg. Fold down any excess splint material at the knee. Fold the stockinette and cast padding over the ends of the fiberglass splint. Starting distally, secure the splint in place with an elastic wrap. () Completed posterior splint.

Figure 2.32 Posterior splinting procedure applied to immobilize the foot and ankle. Position the foot and ankle in the functional position, which is 0° of dorsiflexion. Measure 4 inches (10 cm) beyond the base of the popliteal fossa and 4 inches (10 cm) beyond the metatarsal heads to determine the amount of stockinette needed. Apply the stockinette. Beginning at the metatarsal heads, roll the cast padding circumferentially from distal to proximal ending at the base of the popliteal fossa. Measure from the base of the popliteal fossa to the metatarsal heads to determine the length of the splint. Starting at the metatarsal heads, position the posterior splint against the plantar surface of the foot and posterior aspect of the leg. Fold down any excess splint material at the knee. Fold the stockinette and cast padding over the ends of the fiberglass splint. Starting distally, secure the splint in place with an elastic wrap. () Completed posterior splint.

Figure 2.32 Posterior splinting procedure applied to immobilize the foot and ankle. Position the foot and ankle in the functional position, which is 0° of dorsiflexion. Measure 4 inches (10 cm) beyond the base of the popliteal fossa and 4 inches (10 cm) beyond the metatarsal heads to determine the amount of stockinette needed. Apply the stockinette. Beginning at the metatarsal heads, roll the cast padding circumferentially from distal to proximal ending at the base of the popliteal fossa. Measure from the base of the popliteal fossa to the metatarsal heads to determine the length of the splint. Starting at the metatarsal heads, position the posterior splint against the plantar surface of the foot and posterior aspect of the leg. Fold down any excess splint material at the knee. Fold the stockinette and cast padding over the ends of the fiberglass splint. Starting distally, secure the splint in place with an elastic wrap. () Completed posterior splint.

Figure 2.32 Posterior splinting procedure applied to immobilize the foot and ankle. Position the foot and ankle in the functional position, which is 0° of dorsiflexion. Measure 4 inches (10 cm) beyond the base of the popliteal fossa and 4 inches (10 cm) beyond the metatarsal heads to determine the amount of stockinette needed. Apply the stockinette. Beginning at the metatarsal heads, roll the cast padding circumferentially from distal to proximal ending at the base of the popliteal fossa. Measure from the base of the popliteal fossa to the metatarsal heads to determine the length of the splint. Starting at the metatarsal heads, position the posterior splint against the plantar surface of the foot and posterior aspect of the leg. Fold down any excess splint material at the knee. Fold the stockinette and cast padding over the ends of the fiberglass splint. Starting distally, secure the splint in place with an elastic wrap. () Completed posterior splint.

Figure 2.32 Posterior splinting procedure applied to immobilize the foot and ankle. Position the foot and ankle in the functional position, which is 0° of dorsiflexion. Measure 4 inches (10 cm) beyond the base of the popliteal fossa and 4 inches (10 cm) beyond the metatarsal heads to determine the amount of stockinette needed. Apply the stockinette. Beginning at the metatarsal heads, roll the cast padding circumferentially from distal to proximal ending at the base of the popliteal fossa. Measure from the base of the popliteal fossa to the metatarsal heads to determine the length of the splint. Starting at the metatarsal heads, position the posterior splint against the plantar surface of the foot and posterior aspect of the leg. Fold down any excess splint material at the knee. Fold the stockinette and cast padding over the ends of the fiberglass splint. Starting distally, secure the splint in place with an elastic wrap. () Completed posterior splint.

Figure 2.32 Posterior splinting procedure applied to immobilize the foot and ankle. Position the foot and ankle in the functional position, which is 0° of dorsiflexion. Measure 4 inches (10 cm) beyond the base of the popliteal fossa and 4 inches (10 cm) beyond the metatarsal heads to determine the amount of stockinette needed. Apply the stockinette. Beginning at the metatarsal heads, roll the cast padding circumferentially from distal to proximal ending at the base of the popliteal fossa. Measure from the base of the popliteal fossa to the metatarsal heads to determine the length of the splint. Starting at the metatarsal heads, position the posterior splint against the plantar surface of the foot and posterior aspect of the leg. Fold down any excess splint material at the knee. Fold the stockinette and cast padding over the ends of the fiberglass splint. Starting distally, secure the splint in place with an elastic wrap. () Completed posterior splint.

Figure 2.32 Posterior splinting procedure applied to immobilize the foot and ankle. Position the foot and ankle in the functional position, which is 0° of dorsiflexion. Measure 4 inches (10 cm) beyond the base of the popliteal fossa and 4 inches (10 cm) beyond the metatarsal heads to determine the amount of stockinette needed. Apply the stockinette. Beginning at the metatarsal heads, roll the cast padding circumferentially from distal to proximal ending at the base of the popliteal fossa. Measure from the base of the popliteal fossa to the metatarsal heads to determine the length of the splint. Starting at the metatarsal heads, position the posterior splint against the plantar surface of the foot and posterior aspect of the leg. Fold down any excess splint material at the knee. Fold the stockinette and cast padding over the ends of the fiberglass splint. Starting distally, secure the splint in place with an elastic wrap. () Completed posterior splint.

Figure 2.32 Posterior splinting procedure applied to immobilize the foot and ankle. Position the foot and ankle in the functional position, which is 0° of dorsiflexion. Measure 4 inches (10 cm) beyond the base of the popliteal fossa and 4 inches (10 cm) beyond the metatarsal heads to determine the amount of stockinette needed. Apply the stockinette. Beginning at the metatarsal heads, roll the cast padding circumferentially from distal to proximal ending at the base of the popliteal fossa. Measure from the base of the popliteal fossa to the metatarsal heads to determine the length of the splint. Starting at the metatarsal heads, position the posterior splint against the plantar surface of the foot and posterior aspect of the leg. Fold down any excess splint material at the knee. Fold the stockinette and cast padding over the ends of the fiberglass splint. Starting distally, secure the splint in place with an elastic wrap. () Completed posterior splint.

Figure 2.32 Posterior splinting procedure applied to immobilize the foot and ankle. Position the foot and ankle in the functional position, which is 0° of dorsiflexion. Measure 4 inches (10 cm) beyond the base of the popliteal fossa and 4 inches (10 cm) beyond the metatarsal heads to determine the amount of stockinette needed. Apply the stockinette. Beginning at the metatarsal heads, roll the cast padding circumferentially from distal to proximal ending at the base of the popliteal fossa. Measure from the base of the popliteal fossa to the metatarsal heads to determine the length of the splint. Starting at the metatarsal heads, position the posterior splint against the plantar surface of the foot and posterior aspect of the leg. Fold down any excess splint material at the knee. Fold the stockinette and cast padding over the ends of the fiberglass splint. Starting distally, secure the splint in place with an elastic wrap. () Completed posterior splint.
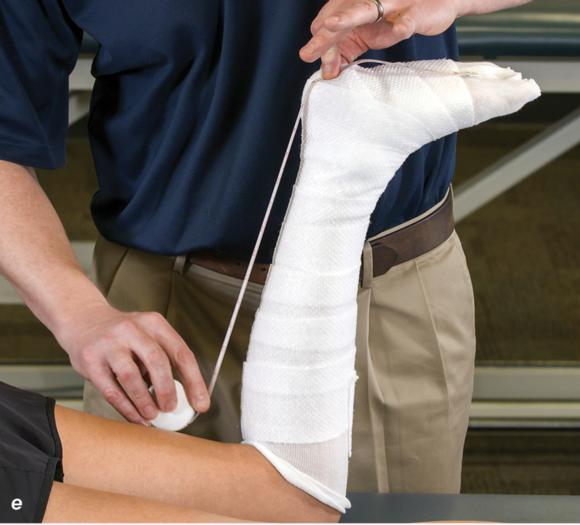
Figure 2.32 Posterior splinting procedure applied to immobilize the foot and ankle. (a) Position the foot and ankle in the functional position, which is 0° of dorsiflexion. (b) Measure 4 inches (10 cm) beyond the base of the popliteal fossa and 4 inches (10 cm) beyond the metatarsal heads to determine the amount of stockinette needed. (c) Apply the stockinette. (d) Beginning at the metatarsal heads, roll the cast padding circumferentially from distal to proximal ending at the base of the popliteal fossa. (e) Measure from the base of the popliteal fossa to the metatarsal heads to determine the length of the splint. (f) Starting at the metatarsal heads, position the posterior splint against the plantar surface of the foot and posterior aspect of the leg. (g) Fold down any excess splint material at the knee. (h) Fold the stockinette and cast padding over the ends of the fiberglass splint. (i) Starting distally, secure the splint in place with an elastic wrap. (j) Completed posterior splint.


Video 2.11 demonstrates the application of a posterior leg splint.


Figure 2.33 Non-weight-bearing short leg cast to immobilize the foot and ankle. Position the foot and ankle in the functional position, which is 0° of dorsiflexion. Measure 4 inches (10 cm) beyond the tibial tubercle and 4 inches (10 cm) beyond the metatarsal heads to determine the amount of stockinette needed. Apply the stockinette, and cut a slit in the stockinette across the front part of the ankle to eliminate any folds. Beginning at the metatarsal heads, roll the cast padding circumferentially from distal to proximal, overlapping by 50% to end at the tibial tubercle. Do not cover the heel at this time. Apply extra padding to protect the malleoli. Cast padding should now be applied to the heel. Starting at the metatarsal heads, begin applying the fiberglass from distal to proximal, overlapping the previous layer by 50%. Initially close in the foot and ankle with fiberglass, followed by the lower leg. Fold down the stockinette and secure the ends of the stockinette with the final layers of fiberglass. Using the palm and heel of your hand, mold the casting material as needed. () Completed non-weight-bearing short leg cast.

Figure 2.33 Non-weight-bearing short leg cast to immobilize the foot and ankle. Position the foot and ankle in the functional position, which is 0° of dorsiflexion. Measure 4 inches (10 cm) beyond the tibial tubercle and 4 inches (10 cm) beyond the metatarsal heads to determine the amount of stockinette needed. Apply the stockinette, and cut a slit in the stockinette across the front part of the ankle to eliminate any folds. Beginning at the metatarsal heads, roll the cast padding circumferentially from distal to proximal, overlapping by 50% to end at the tibial tubercle. Do not cover the heel at this time. Apply extra padding to protect the malleoli. Cast padding should now be applied to the heel. Starting at the metatarsal heads, begin applying the fiberglass from distal to proximal, overlapping the previous layer by 50%. Initially close in the foot and ankle with fiberglass, followed by the lower leg. Fold down the stockinette and secure the ends of the stockinette with the final layers of fiberglass. Using the palm and heel of your hand, mold the casting material as needed. () Completed non-weight-bearing short leg cast.

Figure 2.33 Non-weight-bearing short leg cast to immobilize the foot and ankle. Position the foot and ankle in the functional position, which is 0° of dorsiflexion. Measure 4 inches (10 cm) beyond the tibial tubercle and 4 inches (10 cm) beyond the metatarsal heads to determine the amount of stockinette needed. Apply the stockinette, and cut a slit in the stockinette across the front part of the ankle to eliminate any folds. Beginning at the metatarsal heads, roll the cast padding circumferentially from distal to proximal, overlapping by 50% to end at the tibial tubercle. Do not cover the heel at this time. Apply extra padding to protect the malleoli. Cast padding should now be applied to the heel. Starting at the metatarsal heads, begin applying the fiberglass from distal to proximal, overlapping the previous layer by 50%. Initially close in the foot and ankle with fiberglass, followed by the lower leg. Fold down the stockinette and secure the ends of the stockinette with the final layers of fiberglass. Using the palm and heel of your hand, mold the casting material as needed. () Completed non-weight-bearing short leg cast.

Figure 2.33 Non-weight-bearing short leg cast to immobilize the foot and ankle. Position the foot and ankle in the functional position, which is 0° of dorsiflexion. Measure 4 inches (10 cm) beyond the tibial tubercle and 4 inches (10 cm) beyond the metatarsal heads to determine the amount of stockinette needed. Apply the stockinette, and cut a slit in the stockinette across the front part of the ankle to eliminate any folds. Beginning at the metatarsal heads, roll the cast padding circumferentially from distal to proximal, overlapping by 50% to end at the tibial tubercle. Do not cover the heel at this time. Apply extra padding to protect the malleoli. Cast padding should now be applied to the heel. Starting at the metatarsal heads, begin applying the fiberglass from distal to proximal, overlapping the previous layer by 50%. Initially close in the foot and ankle with fiberglass, followed by the lower leg. Fold down the stockinette and secure the ends of the stockinette with the final layers of fiberglass. Using the palm and heel of your hand, mold the casting material as needed. () Completed non-weight-bearing short leg cast.

Figure 2.33 Non-weight-bearing short leg cast to immobilize the foot and ankle. Position the foot and ankle in the functional position, which is 0° of dorsiflexion. Measure 4 inches (10 cm) beyond the tibial tubercle and 4 inches (10 cm) beyond the metatarsal heads to determine the amount of stockinette needed. Apply the stockinette, and cut a slit in the stockinette across the front part of the ankle to eliminate any folds. Beginning at the metatarsal heads, roll the cast padding circumferentially from distal to proximal, overlapping by 50% to end at the tibial tubercle. Do not cover the heel at this time. Apply extra padding to protect the malleoli. Cast padding should now be applied to the heel. Starting at the metatarsal heads, begin applying the fiberglass from distal to proximal, overlapping the previous layer by 50%. Initially close in the foot and ankle with fiberglass, followed by the lower leg. Fold down the stockinette and secure the ends of the stockinette with the final layers of fiberglass. Using the palm and heel of your hand, mold the casting material as needed. () Completed non-weight-bearing short leg cast.

Figure 2.33 Non-weight-bearing short leg cast to immobilize the foot and ankle. Position the foot and ankle in the functional position, which is 0° of dorsiflexion. Measure 4 inches (10 cm) beyond the tibial tubercle and 4 inches (10 cm) beyond the metatarsal heads to determine the amount of stockinette needed. Apply the stockinette, and cut a slit in the stockinette across the front part of the ankle to eliminate any folds. Beginning at the metatarsal heads, roll the cast padding circumferentially from distal to proximal, overlapping by 50% to end at the tibial tubercle. Do not cover the heel at this time. Apply extra padding to protect the malleoli. Cast padding should now be applied to the heel. Starting at the metatarsal heads, begin applying the fiberglass from distal to proximal, overlapping the previous layer by 50%. Initially close in the foot and ankle with fiberglass, followed by the lower leg. Fold down the stockinette and secure the ends of the stockinette with the final layers of fiberglass. Using the palm and heel of your hand, mold the casting material as needed. () Completed non-weight-bearing short leg cast.

Figure 2.33 Non-weight-bearing short leg cast to immobilize the foot and ankle. Position the foot and ankle in the functional position, which is 0° of dorsiflexion. Measure 4 inches (10 cm) beyond the tibial tubercle and 4 inches (10 cm) beyond the metatarsal heads to determine the amount of stockinette needed. Apply the stockinette, and cut a slit in the stockinette across the front part of the ankle to eliminate any folds. Beginning at the metatarsal heads, roll the cast padding circumferentially from distal to proximal, overlapping by 50% to end at the tibial tubercle. Do not cover the heel at this time. Apply extra padding to protect the malleoli. Cast padding should now be applied to the heel. Starting at the metatarsal heads, begin applying the fiberglass from distal to proximal, overlapping the previous layer by 50%. Initially close in the foot and ankle with fiberglass, followed by the lower leg. Fold down the stockinette and secure the ends of the stockinette with the final layers of fiberglass. Using the palm and heel of your hand, mold the casting material as needed. () Completed non-weight-bearing short leg cast.

Figure 2.33 Non-weight-bearing short leg cast to immobilize the foot and ankle. Position the foot and ankle in the functional position, which is 0° of dorsiflexion. Measure 4 inches (10 cm) beyond the tibial tubercle and 4 inches (10 cm) beyond the metatarsal heads to determine the amount of stockinette needed. Apply the stockinette, and cut a slit in the stockinette across the front part of the ankle to eliminate any folds. Beginning at the metatarsal heads, roll the cast padding circumferentially from distal to proximal, overlapping by 50% to end at the tibial tubercle. Do not cover the heel at this time. Apply extra padding to protect the malleoli. Cast padding should now be applied to the heel. Starting at the metatarsal heads, begin applying the fiberglass from distal to proximal, overlapping the previous layer by 50%. Initially close in the foot and ankle with fiberglass, followed by the lower leg. Fold down the stockinette and secure the ends of the stockinette with the final layers of fiberglass. Using the palm and heel of your hand, mold the casting material as needed. () Completed non-weight-bearing short leg cast.

Figure 2.33 Non-weight-bearing short leg cast to immobilize the foot and ankle. Position the foot and ankle in the functional position, which is 0° of dorsiflexion. Measure 4 inches (10 cm) beyond the tibial tubercle and 4 inches (10 cm) beyond the metatarsal heads to determine the amount of stockinette needed. Apply the stockinette, and cut a slit in the stockinette across the front part of the ankle to eliminate any folds. Beginning at the metatarsal heads, roll the cast padding circumferentially from distal to proximal, overlapping by 50% to end at the tibial tubercle. Do not cover the heel at this time. Apply extra padding to protect the malleoli. Cast padding should now be applied to the heel. Starting at the metatarsal heads, begin applying the fiberglass from distal to proximal, overlapping the previous layer by 50%. Initially close in the foot and ankle with fiberglass, followed by the lower leg. Fold down the stockinette and secure the ends of the stockinette with the final layers of fiberglass. Using the palm and heel of your hand, mold the casting material as needed. () Completed non-weight-bearing short leg cast.

Figure 2.33 Non-weight-bearing short leg cast to immobilize the foot and ankle. Position the foot and ankle in the functional position, which is 0° of dorsiflexion. Measure 4 inches (10 cm) beyond the tibial tubercle and 4 inches (10 cm) beyond the metatarsal heads to determine the amount of stockinette needed. Apply the stockinette, and cut a slit in the stockinette across the front part of the ankle to eliminate any folds. Beginning at the metatarsal heads, roll the cast padding circumferentially from distal to proximal, overlapping by 50% to end at the tibial tubercle. Do not cover the heel at this time. Apply extra padding to protect the malleoli. Cast padding should now be applied to the heel. Starting at the metatarsal heads, begin applying the fiberglass from distal to proximal, overlapping the previous layer by 50%. Initially close in the foot and ankle with fiberglass, followed by the lower leg. Fold down the stockinette and secure the ends of the stockinette with the final layers of fiberglass. Using the palm and heel of your hand, mold the casting material as needed. () Completed non-weight-bearing short leg cast.

Figure 2.33 Non-weight-bearing short leg cast to immobilize the foot and ankle. Position the foot and ankle in the functional position, which is 0° of dorsiflexion. Measure 4 inches (10 cm) beyond the tibial tubercle and 4 inches (10 cm) beyond the metatarsal heads to determine the amount of stockinette needed. Apply the stockinette, and cut a slit in the stockinette across the front part of the ankle to eliminate any folds. Beginning at the metatarsal heads, roll the cast padding circumferentially from distal to proximal, overlapping by 50% to end at the tibial tubercle. Do not cover the heel at this time. Apply extra padding to protect the malleoli. Cast padding should now be applied to the heel. Starting at the metatarsal heads, begin applying the fiberglass from distal to proximal, overlapping the previous layer by 50%. Initially close in the foot and ankle with fiberglass, followed by the lower leg. Fold down the stockinette and secure the ends of the stockinette with the final layers of fiberglass. Using the palm and heel of your hand, mold the casting material as needed. () Completed non-weight-bearing short leg cast.

Figure 2.33 Non-weight-bearing short leg cast to immobilize the foot and ankle. Position the foot and ankle in the functional position, which is 0° of dorsiflexion. Measure 4 inches (10 cm) beyond the tibial tubercle and 4 inches (10 cm) beyond the metatarsal heads to determine the amount of stockinette needed. Apply the stockinette, and cut a slit in the stockinette across the front part of the ankle to eliminate any folds. Beginning at the metatarsal heads, roll the cast padding circumferentially from distal to proximal, overlapping by 50% to end at the tibial tubercle. Do not cover the heel at this time. Apply extra padding to protect the malleoli. Cast padding should now be applied to the heel. Starting at the metatarsal heads, begin applying the fiberglass from distal to proximal, overlapping the previous layer by 50%. Initially close in the foot and ankle with fiberglass, followed by the lower leg. Fold down the stockinette and secure the ends of the stockinette with the final layers of fiberglass. Using the palm and heel of your hand, mold the casting material as needed. () Completed non-weight-bearing short leg cast.

Figure 2.33 Non-weight-bearing short leg cast to immobilize the foot and ankle. Position the foot and ankle in the functional position, which is 0° of dorsiflexion. Measure 4 inches (10 cm) beyond the tibial tubercle and 4 inches (10 cm) beyond the metatarsal heads to determine the amount of stockinette needed. Apply the stockinette, and cut a slit in the stockinette across the front part of the ankle to eliminate any folds. Beginning at the metatarsal heads, roll the cast padding circumferentially from distal to proximal, overlapping by 50% to end at the tibial tubercle. Do not cover the heel at this time. Apply extra padding to protect the malleoli. Cast padding should now be applied to the heel. Starting at the metatarsal heads, begin applying the fiberglass from distal to proximal, overlapping the previous layer by 50%. Initially close in the foot and ankle with fiberglass, followed by the lower leg. Fold down the stockinette and secure the ends of the stockinette with the final layers of fiberglass. Using the palm and heel of your hand, mold the casting material as needed. () Completed non-weight-bearing short leg cast.

Figure 2.33 Non-weight-bearing short leg cast to immobilize the foot and ankle. Position the foot and ankle in the functional position, which is 0° of dorsiflexion. Measure 4 inches (10 cm) beyond the tibial tubercle and 4 inches (10 cm) beyond the metatarsal heads to determine the amount of stockinette needed. Apply the stockinette, and cut a slit in the stockinette across the front part of the ankle to eliminate any folds. Beginning at the metatarsal heads, roll the cast padding circumferentially from distal to proximal, overlapping by 50% to end at the tibial tubercle. Do not cover the heel at this time. Apply extra padding to protect the malleoli. Cast padding should now be applied to the heel. Starting at the metatarsal heads, begin applying the fiberglass from distal to proximal, overlapping the previous layer by 50%. Initially close in the foot and ankle with fiberglass, followed by the lower leg. Fold down the stockinette and secure the ends of the stockinette with the final layers of fiberglass. Using the palm and heel of your hand, mold the casting material as needed. () Completed non-weight-bearing short leg cast.
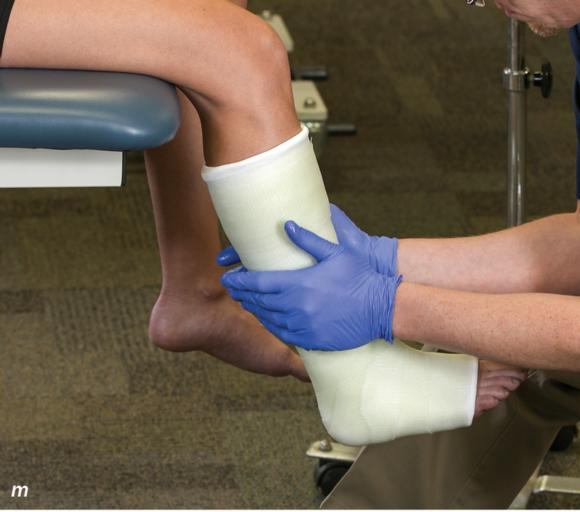
Figure 2.33 Non-weight-bearing short leg cast to immobilize the foot and ankle. (a) Position the foot and ankle in the functional position, which is 0° of dorsiflexion. (b) Measure 4 inches (10 cm) beyond the tibial tubercle and 4 inches (10 cm) beyond the metatarsal heads to determine the amount of stockinette needed. (c) Apply the stockinette, and (d) cut a slit in the stockinette across the front part of the ankle to eliminate any folds. (e) Beginning at the metatarsal heads, roll the cast padding circumferentially from distal to proximal, overlapping by 50% to end at the tibial tubercle. Do not cover the heel at this time. (f) Apply extra padding to protect the malleoli. (g) Cast padding should now be applied to the heel. (h) Starting at the metatarsal heads, begin applying the fiberglass from distal to proximal, overlapping the previous layer by 50%. (i) Initially close in the foot and ankle with fiberglass, (j) followed by the lower leg. (k) Fold down the stockinette and (l) secure the ends of the stockinette with the final layers of fiberglass. (m) Using the palm and heel of your hand, mold the casting material as needed. (n) Completed non-weight-bearing short leg cast.

Learn more about Athletic Taping, Bracing, and Casting, Fourth Edition.

More Excerpts From Athletic Taping